Showing posts with label Google Classroom tips. Show all posts

Asking Questions & Reusing Posts in Google Classroom™

Create Questions and Reuse Posts in Google Classroom™  www.traceeorman.com


How to Create Questions and Reuse Posts in Google Classroom™

This is the fourth blog post in my Google Classroom™ tutorial series. I sincerely hope my step-by-step directions and examples have helped you set up your own classes and assignments to use with your students. Google Classroom™ is an excellent way to share digital content and interact with students in a safe and secure way. If your school has not created a FREE G Suite for Education account yet, encourage your administration to do so. It is well worth it no matter if you are using Chrome Books, iPads, laptops, desktop PCs, or students are bringing their own devices. Google Classroom™ is available on both Android® and Apple®/iPhone™ platforms. 

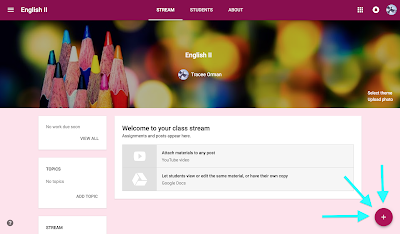
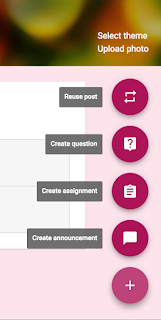
Today I'm going to show you how to use the "Create question" and "Reuse post" options when you click (or hover over) the plus (+) sign in your class stream. 


CREATE QUESTION

The "question" feature in Google Classroom™ is a nice option when you want to survey or poll your students, start an online discussion, and/or check for understanding and comprehension.  It is a perfect tool to use for a bell ringer or exit slip (quick 5-minute assessments to refresh, review, quiz, and/or survey your students). The only drawback is you can only ask one question, so if you have additional questions you want to ask, use a form in Google Forms™ instead.

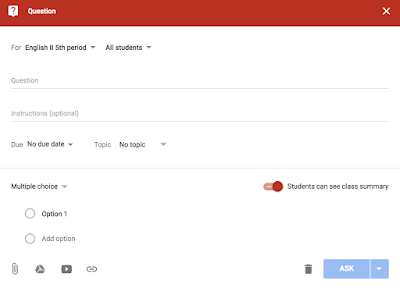
To create a question, hover over the plus (+) sign and select "Create question." A pop-up window will appear that looks like this:


Tutorial to create a question in Google Classroom™  www.traceeorman.com

You'll need to decide the following in the drop-down menus:
  2. Do you want to post the question to certain students or the entire class (if you are sharing with multiple classes, you must post to ALL students)?
  3. When is your due date? (If you are using this as a bell ringer or exit slip and you want it done before students leave your class, make sure to set the time as well as the date.)*
  4. Do you want to tag this question with a topic?

*If a student is absent, you can assign this question to that student only when he/she returns. You'll want to follow the "Reuse post" direction below to do that.

TIP: If you need a refresher for decisions 1-4, see my previous posts.

Next, you will want to decide the following:
  5. Is your question a short answer or multiple choice question?


  6. (For short answer questions only) Do you want students to respond to their classmate's answers or not? This is good if you want students to be able to share their thoughts for an online discussion-type question. However, if you are assessing them on what they know or remember, you will NOT want them to see other students' responses.

Create a question in Google Classroom™   www.traceeorman.com
Short-answer options when posting a question in Google Classroom™.

  7. (For short answer questions only) Do you want students to be able to edit their answers? If it's not an assessment, you should probably allow it. If it is an assessment, then you won't want them changing their answers after they've submitted them. (See below for the option that comes up if you choose a multiple choice question.) 

After you've made those decisions, go ahead and type your question. Here are a couple examples using both types of questions:

SHORT ANSWER:
Create a question in Google Classroom™   www.traceeorman.com
Example of a short-answer question in Google Classroom™.

MULTIPLE CHOICE:
Create a question in Google Classroom™   www.traceeorman.com
Multiple choice options when posting a question in Google Classroom™.

When you choose multiple choice (above), you will be given numbered answer options. You will also be asked if you want your students to be able to see a summary of their classmates' responses.

Create a question in Google Classroom™   www.traceeorman.com
Decide whether or not you want students to see a summary of their classmates' responses.


Again, if you are assessing them, it's probably wise to turn that off. But if you would like for them to see the results (as a discussion starter or to see poll results), make sure to allow this. It will show them right in the post how other students have responded. 

Here's another example from the students' point-of-view:
Question responses in Google Classroom™   www.traceeorman.com
Students will see this when a multiple-choice question is asked.

Question responses in Google Classroom™   www.traceeorman.com
Students can see how their classmates answered and comment on the post.
Question responses in Google Classroom™   www.traceeorman.com
The teacher will see a summary of the students' responses in the left column.
Clicking on each student will show individual results.


TIP: If you wish to ask more than one question, use Google Forms™ rather than the "Create question" feature. In Google Forms™, you can ask multiple questions and even vary the question types (i.e. have a few short answer, a few multiple choice, and offer checkbox-style questions for multiple answers). Leave me a comment below if you'd like to see a tutorial on making a form to use in Classroom™.

Here's a video tutorial for creating a question in Google Classroom™:


REUSING A POST
Reusing a post means exactly what it says: you can choose to copy a previous post rather than retype it all over again. This comes in handy when you forget to share an assignment, announcement, or question with multiple classes. It's also handy for copying posts from year-to-year. Since you will want to create a new class each year, you can just use "Reuse post" to copy those same assignments you gave in previous years.

To do so, you just select the "Reuse post" when you hover over the plus (+) sign:

Reuse a post in Google Classroom™   www.traceeorman.com

A pop-up window will appear that asks you which post from the current class you'd like to reuse. You can select a post OR click on the arrow in the top left corner to select a different current or archived class.
Reuse a post in Google Classroom™   www.traceeorman.com


If you click on the arrow, it will take you to a list of all your current and archived classes:


Reuse a post in Google Classroom™   www.traceeorman.com

Once you select a class to choose from, you go back to a screen that shows all the posts from that class. If the post has an attachment, make sure to check the box in the lower left corner that says "Create new copies of all attachments." If you don't click that box, none of the attachments will be saved in your class folder in Google Drive™, nor will your students have their own copies of the attachments.
Reuse a post in Google Classroom™   www.traceeorman.com

When you select the post to reuse by clicking on the "REUSE" blue button, you are given the same type of options as normal for posting:


Reuse a post in Google Classroom™   www.traceeorman.com

You'll need to make the same decisions as you do with any normal posting. It will then appear as any other post in your class stream.


Here's a video tutorial for reusing a post:


Thank you for visiting. I hope my tips have been helpful for you and your students.
My next post will walk you through the "Calendar" and "To-Do" features in Google Classroom™.

If you have additional topics you'd like to see me cover, please comment below. 


Here are ALL of my Google Classroom™ posts:


Tips for secondary teachers on how you should set up your classes (pros and cons of having one Classroom per subject or one Classroom per class period).

Google Classroom Tips www.traceeorman.com


Includes tips and tutorials for creating new classes; customizing the look of your classes; adding new materials/online text; adding students; and adding co-teachers, teacher aides, or access for special education teachers. 


Includes tips and tutorials for creating assignments, announcements, and topics. Also has tips on how to save and delay posting and collecting work for students.


Includes tips and tutorials for creating questions, the types of questions available (multiple choice & short answer), allowing students to interact and respond to one another, and how to easily reuse posts from class to class and year to year.


To see all my previous (and future) posts on navigating Google Classroom™, click below:


Google Classroom™ tips from a veteran teacher user   www.traceeorman.com

Google Classroom™ is a trademark of Google Inc. Use of this trademark is subject to Google Brand Permissions. 

Creating Assignments in Google Classroom™

Creating and Posting Assignments in Google Classroom™  www.traceeorman.com


Creating and Posting Assignments, Announcements, and Questions in Google Classroom™

Now that you've set up your classes and invited your students to join them, it's time to start posting content. Your class "stream" will look like this (make sure you have the "Stream" tab selected in the middle of the header):

Creating and Posting Assignments in Google Classroom™  www.traceeorman.com

When you click on the plus (+) sign in the lower right-hand corner, your options for posting appear:

How to post an announcement in Google Classroom™  www.traceeorman.com

Posting options in Google Classroom™  www.traceeorman.com

Google Classroom gives you four options for the types of content to post: an Announcement, Assignment, Question, or Reuse a Post. In this post, I'll discuss Announcements and Assignments with examples. In my next post, I'll cover posting a Question and Reusing a post.

ANNOUNCEMENTS: Use this to announce to your class any important or pertinent information, reminders, supplemental materials to help them, etc. You can use this feature right away to welcome students to your online classroom and give them any class news, instructions, advice, or whatever. Share a link to a vocabulary list in Quizlet or No Red Ink assignment (more on that below). I also used "Announcement" to share funny memes or videos related to our unit of study.

Example of an announcement in Google Classroom™  www.traceeorman.com

After you click on the "Create announcement" choice, a pop-up window appears, which looks like this:

Posting an announcement in Google Classroom™  www.traceeorman.com

You have several decisions to make: Decide if you want to share it with just the one class or multiple classes. If you want it to be shared with multiple classes, click on the drop-down menu for the class and you can check off the other classes you want to share with.

Selecting classes for posting in Google Classroom™  www.traceeorman.com

Another option is if you want to just share with certain students. For example, if three students were absent from class and you want to share some lecture notes with them, you can select just those three from that drop-down menu. If you choose this option, you can NOT share the announcement with other classes; you'll have to go into each one and create a new announcement for individuals from those classes. Normally when you click on "All students," a list of your students will come up. (The screenshot below was taken before students joined the class.)

Selecting students for posting in Google Classroom™  www.traceeorman.com

TIP: You can also create "Topics" for your announcements or assignments. These are like tags that will allow you to click on the tag and find all the other posts under that topic. Example topics you could use might be for different units of study (a specific novel, short stories, argument writing, poetry, etc.), or for general topics of study (reading, writing, vocabulary, grammar, etc.), types of work in class (bell ringer, homework, essay, reading assignment, etc.), or for time periods (1st quarter, 2nd quarter, or September, October, etc.). Whatever you choose, just remember that you can only choose ONE topic per posting, so make it something that will make sense for your students (or you) to use as a tag.

Creating New Topics in Google Classroom™  www.traceeorman.com


Watch this video on creating topics using the "Topics" sidebar:


After you have decided on a topic (and you don't have to--I didn't use them at all my first year), you will notice there are options below on whether you want to attach a document or link. The icons represent attaching a file (paperclip), attaching a file from Google Drive™, linking to a YouTube video (play button), and adding a link from the web:

Options for attachments in Google Classroom™  www.traceeorman.com

If you click on the first two (attaching documents), it takes you to a window where you can choose to upload from your computer/device or from Google Drive™ using tabs at the top ("Recent" pulls your most recent files you've uploaded or modified in Google Drive™ and "Starred" are all the documents you have marked with a star in your Drive*--see below):

Inserting or attaching files in an assignment in Google Classroom™  www.traceeorman.com

Whatever you insert, it will create a copy of it in a special Classroom folder. (More on that in another post.)

*TIP: To mark a document with a star so it is easy to find when attaching to posts, select that file in Google Drive™, then go up to the document settings and select the three dots that indicate more options. In the drop down, you'll see the option to "Add a star." Select that and then it will appear in your "Starred" options.
Starring files in Google Drive™  www.traceeorman.com

Finally, you can either "Post" the announcement, "Schedule" it to be posted later, or "Save" your draft and edit and post later. I often used either the "Schedule" or "Save" feature when I created a post late at night and did not want to wake my students with a notification. Be aware that unless students have turned off those notifications, they will get them on their device when you post something.

Announcement posting options in Google Classroom™  www.traceeorman.com

Once you post it, it will appear in the class "Stream."


ASSIGNMENTS: Use the assignment feature to post something that you want to distribute and collect from students for a grade. This should be something that also has a due date. If there isn't a due date or work to collect, consider just using the announcement feature instead.

To post an assignment, follow the same steps as an announcement, but select "Create assignment." You will see a pop-up window that looks like this:

Creating an assignment in Google Classroom™  www.traceeorman.com

You have the same decisions to make as you did with posting an announcement: 
  1. Who do you want to assign this to? All classes? Just this class? 
  2. All students? Just certain students? 
  3. What do you want to title your assignment? 
  4. Would you like to file this under one of your topics?
  5. Would you like to attach a document or link to this assignment? (More on this in #8)
  6. Would you like to assign immediately, schedule it, or save the draft?

In addition, you will also need to decide the following:
  7. Due date: You can select a day and a specific time by clicking on the drop-down menus.
Selecting the due date on an assignment in Google Classroom™  www.traceeorman.com

  8. Attachments: Do you want to share a document that all students can view, or do you want each student to be able to collaborate and edit the same document, or allow each individual to have their own copy? 
Assignment attachment options in Google Classroom™  www.traceeorman.com

If it is something they are going to turn in to you, make sure you select that each student has his/her own copy. (I can't tell you how many times I forgot to select that option and I would hear several students call out, "I can't type on this!!") 

TIP: I mentioned this in my last blog post, but it is worth mentioning again: If you make a copy for each student and you have a co-teacher, it does NOT make a copy for the co-teacher. Therefore, if your co-teacher opens the document, any edits she/he makes happen on your template and appear on every student copy. Several times I had an aide typing the answers onto what she thought was her own copy as I was lecturing. Instead, she was typing the answers on every single student's copy. And do you think those students told us right away? Of course not!

The only fix for this is to make sure your co-teacher makes her/his own copy manually. She/He can open the file, then select File > Make a copy. Right now, this is the only way to ensure your original template remains intact. The students DO NOT have to do this; only a co-teacher if you have one in your Google Classroom™ class.
Making a copy of a file in Google Classroom™  www.traceeorman.com
If you have a co-teacher in Google Classroom™,
she/he will need to make a copy of the file in order to make changes to it.

You can review how to create an assignment in my video:


Thanks for stopping by for this tutorial. I will post next time on using the "Ask a question" and "Reuse post" options. 


Here are ALL of my Google Classroom™ posts:


Tips for secondary teachers on how you should set up your classes (pros and cons of having one Classroom per subject or one Classroom per class period).

Google Classroom Tips www.traceeorman.com


Includes tips and tutorials for creating new classes; customizing the look of your classes; adding new materials/online text; adding students; and adding co-teachers, teacher aides, or access for special education teachers. 


Includes tips and tutorials for creating assignments, announcements, and topics. Also has tips on how to save and delay posting and collecting work for students.


Includes tips and tutorials for creating questions, the types of questions available (multiple choice & short answer), allowing students to interact and respond to one another, and how to easily reuse posts from class to class and year to year.


To see all of my tutorial posts for using Google Classroom™, click here:
Google Classroom™ tips from www.traceeorman.com


Google Classroom™ is a trademark of Google Inc. Use of this trademark is subject to Google Brand Permissions. 


Getting Started on Google Classroom™

Getting Started on Google Classroom™ www.traceeorman.com


Getting Started on Google Classroom™

Now that you have decided HOW to set up your classes on Classroom™, it's time to start creating them. I will take you through the steps, explaining each one. You can also view the video screen recordings I've embedded to follow along. 

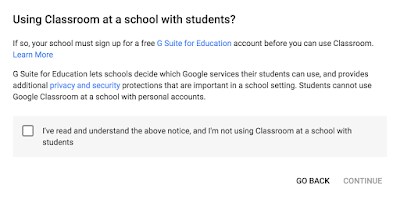
PLEASE NOTE: Using Classroom™does require that your school has a free G Suite for Education account. If you are using it with a personal account, this window will appear:


Terms Using Google Classroom™
In order for your documents and students' work to be private and secure, your school should set up a G suite account.

CREATING A NEW CLASS
After you have opened Classroom™, you will arrive on the Home screen. To add a class, click on the plus (+) sign in the top right of the screen.


Create a new class in Google Classroom™  www.traceeorman.com

A pop-up window will appear, which looks like this:
Create a new class in Google Classroom™  www.traceeorman.com
You will fill out the name of the class (i.e. English II, Algebra I, Government, etc.). You can leave the other lines blank or fill them in. If you are setting up multiple sections for the same class, you can label the sections:
Create a new class in Google Classroom™  www.traceeorman.com

When you click "Create," your class is created and will look similar to this:
Create a new class in Google Classroom™  www.traceeorman.com


CUSTOMIZING THE LOOK OF YOUR CLASS
To change the look of the class, use the "Select theme" or "Upload photo" options on the right side of the screen. 


When you select the theme, you are given options in a "Gallery." You can also select "Patterns" for additional selections.
Change the header image in Google Classroom™  www.traceeorman.comChange the header image in Google Classroom™  www.traceeorman.com

If you choose to upload a photo, make sure the dimensions are 2000 x 400 pixels (or 20.833 x 4.1667 inches).

Watch a video recap of these directions here:


ADD CLASSROOM MATERIALS
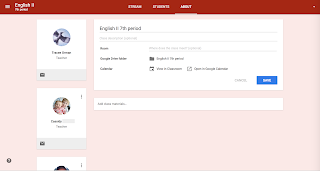
TIP: After you make your class look the way you want, click on the "About" section to add another teacher, attach classroom materials (i.e. if you have an online textbook or other digital materials that are essential for the class, THIS is where you can attach them), view your Classroom Drive folder, and/or Classroom calendar.  See in the video below:


Your students will be able to access these materials anytime they need them without having to search the class stream.

ADDING ANOTHER TEACHER
If you co-teach a class, have a teacher's aide, or want to give another teacher (i.e. a special education teacher) access to your class, you can also do this in the "About" section. Just click on the "Invite Teacher" button and enter the email. The teacher will be able to do everything you can do except delete the class. 
Invite another teacher to your Google class  www.traceeorman.com


Insert additional details about the class in Google Classroom™  www.traceeorman.com
You can add details about the class in the "About" section.

TIP: If you just want to give an aide or another teacher access to the assignments and class materials, it may be better to add them as a student. Most of my aides just wanted a copy of the online assignments so they could type in notes or answers for themselves. When they had access as a teacher, their notes would appear on every student copy because co-teachers do not get their own copy of the assignment like students do; they have access to YOUR original document. At the time of this blog post, Google Classroom™ does not allow you to set parameters for other teachers. If you still wish to give another teacher or aide full access, let them know ahead of time that if they plan to type on any documents you share, they MUST make a copy of the file first or it will mess up your template for the students.  

ADDING STUDENTS
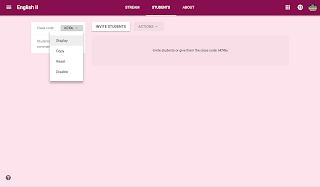
You can add students to your class manually by typing in their email addresses. But that can be very time-consuming. Every class has a unique class code. It's much easier to share your class code with your students and have them add themselves. They will click on "Join class" on their home page, then enter the code you share with them. 

Adding students to your Google Classroom™ class  www.traceeorman.com


You have the ability to display your class code from your screen (using a projector or smart board) to share it with students:


This is also where you can set parameters for your students. Do you want them to be able to create posts? Comment on posts? Or neither? I have found that for some classes, I welcome the feedback and interaction of the students and for others, I had to disable all comment privileges because they made inappropriate remarks. You will need to decide what is best for your classes.

Set permissions for your students in Google Classroom™  www.traceeorman.com


Here's a recap video for adding other teachers and students to your class:


In the next post, I will show you how to add an announcement, assignment, poll your students, start a class discussion, and reuse a post from an archived or another class.


Here are ALL of my Google Classroom™ posts:


Tips for secondary teachers on how you should set up your classes (pros and cons of having one Classroom per subject or one Classroom per class period).

Google Classroom Tips www.traceeorman.com


Includes tips and tutorials for creating new classes; customizing the look of your classes; adding new materials/online text; adding students; and adding co-teachers, teacher aides, or access for special education teachers. 


Includes tips and tutorials for creating assignments, announcements, and topics. Also has tips on how to save and delay posting and collecting work for students.


Includes tips and tutorials for creating questions, the types of questions available (multiple choice & short answer), allowing students to interact and respond to one another, and how to easily reuse posts from class to class and year to year.


Google Classroom™ is a trademark of Google Inc. Use of this trademark is subject to Google Brand Permissions. 

Similar Posts

Related Posts Plugin for WordPress, Blogger...

Total Pageviews