Showing posts with label graphics. Show all posts

Cyber Monday and Tuesday Sale at TeachersPayTeachers

Super Secondary TeachersPayTeachers Cyber Monday Sale

TpT SUPER CYBER SAVINGS 2014! 

Up to 28% off the entire site Monday, December 1st and Tuesday, December 2nd 

Use this promotional code at check out: TPTCYBER 

My fellow teachers who will be participating:
Super secondary TpT teachers want to wish you a wonderful holiday season!


Super Secondary TeachersPayTeachers Cyber Monday Sale

----------------------------------------------------------

If you don't want to wait for the sale to start on Monday
I am currently having a huge BUNDLE BlackFriday14 sale on my clip art graphics and interactive reading notebook activities. This sale will only extend through today, so get them while you can!

Doodle Border Bundle for commercial use

Loopty Loo Doodly Doo graphics bundle for commercial use

Owls - It's a Hoot! Owl clip art graphics bundle for commercial use

New interactive reading notebook activity bundle:
Interactive reading notebook activities bundle - both fiction and nonfiction

Stay tuned for MORE great products I'll be uploading this weekend!

Doodle Clip Art (and More) for Commercial Use

Over the past few weeks I've uploaded several new clip art packages for commercial use in my clip art store. I have so much fun creating these and love seeing them used in different products. :) If you are using them in yours, leave a link in the comments to your product and I'll pin it on my Pinterest board!
Loopty-Loo Doodly-Doo Frames http://www.teacherspayteachers.com/Product/Loopty-Loo-Doodly-Doo-Clip-Art-Frames-Commercial-Use
Loopty-Loo Doodly-Doo Clip Art Frames
Pin It
My Loopty-Loo Doodly-Doo Frames are quickly becoming one of my most popular clip art packages. It includes over 50 frames in several different styles. All the frames include a fully transparent image (the center & all traces of white are erased), a white center, a horizontal layout, and a vertical layout. Some will include even more options.
Doodle Frames Clipart Graphics http://www.teacherspayteachers.com/Product/Loopty-Loo-Doodly-Doo-Clip-Art-Frames-Commercial-Use
Use the frames on different backgrounds for various looks.
Pin It
Another bundle, which can be purchased at a significant discount or as separate packages, is my Just a Little Sketchy Doodle Frames package.
Just a Little Sketchy Clipart Doodle Frames and Shapes http://www.teacherspayteachers.com/Product/Doodle-Sketches-Bundle-of-Clip-Art-Graphics-for-Commercial-Use
Just a Little Sketchy Doodle Frames and Shapes
Pin It
It is the combination of seven different packages of rough doodle sketches in various shapes. These are great for using in school publications (yearbook, newspaper, literary magazine, newsletters, camp brochures, etc.), as well as in your worksheets or other printables for your class. I think they appeal to a wide range and age of students, too.

The package contains the following shapes: circles, rectangles, squares, and arrows. It also has several "frames" packages: fences, criss-cross, little boxes, jagged lines, and squiggly dots.

I created several new smaller bundles of clip art: Starburst Backgrounds & Frames, Rough Lines Borders & Frames, and Glossy 3-D Buttons & Backgrounds: Rectangles. They offer nice clean looks for a myriad of possibilities.
Starburst Backgrounds & Frames GraphicsRough Lines Clip Art FramesGlossy 3-D Backgrounds & Buttons

Pin It
My clip art terms are:
• You may use these images for commercial, personal, and educational use. 
• You may use them in free or priced products.
• You may use the clip art in editable documents, Smartboard, or PPT files for priced products, but NOT for freebies (see next item).
• If you use the image files in a FREE product, please make sure the file is secure and in PDF format so the images cannot be copied.
• The files themselves can not be resold in a clip art/graphics package, but you may use the images commercially if they are used/embedded in your lessons.  
• Please link back to my website somewhere in your document (it can be in fine print): www.traceeorman.com or my TpT store: www.teacherspayteachers.com/Store/Tracee-Orman OR...you can copy this button and use it in your products, if you'd like:
Clip Art and Graphics by Tracee Orman www.traceeorman.com
You may copy & paste this button to use instead of a link-back.

NOTE: Some of my smaller packages have more liberal terms that do NOT require a link back. Also, you can use my free clip art graphics in any type of format (Word, Powerpoint, etc.).

You can keep up with all my new graphics and clip art packages by following my "Graphics and More" pinboard on Pinterest. Thanks for stopping by & I hope you enjoy these new packages!

Designing Your Cover Page - The Rule of Thirds

Photographers know that one way to create an appealing photograph is to follow the "rule of thirds." The rule of thirds is simply breaking up the picture into nine equal parts using two vertical and two horizontal lines. The places where the lines meet are "focal points" and your most important elements should be placed along these lines.

To demonstrate this in photography, see the graphic below. One image naturally follows the rule of thirds and becomes even more visually appealing when it is cropped. The other image is not naturally set up to follow the grid, but after it is cropped, it does become a more interesting picture.

You can use this same principle in design. I use iWork's Pages (Mac) for most of my designs. It is very similar to Adobe's InDesign software, which I used in journalism. You can follow the rule of thirds in any design software, including Microsoft Word. However, using Pages and InDesign make it easier for you to create a grid that you can see, but will not print. In both programs, just place your cursor in the ruler, then hold it down and drag your cursor to the place you want the line. Once you start dragging, a blue line will appear.
Start with a blank document in Pages (or InDesign).

Place your cursor in the ruler, then click and drag it. A blue line will appear. Unclick when the line is where you want it.

To make the horizontal lines, drag from the top ruler.
The lines can always be adjusted by placing your cursor on them and moving them. To get rid of them, just move them right off the page, and they will disappear. (I do not know if Microsoft Word or Powerpoint have the design gridlines feature, but you can always download a template HERE; just be sure to delete it after you've designed your page and before you print, because that one will show up.)
Repeat this step until you have nine equal parts.
Notice that the four intersections will be places that the viewer's eye is drawn. This is where you want to place your dominant features or elements. Also, following the horizontal or vertical lines with a dominant feature (like the title or a large graphic) will be more eye-appealing.
Many people will be tempted to place a dominant image right in the center of the page. I have been guilty of that, as well. But the more stimulating designs will place a dominant image off-center, following one of the vertical or horizontal lines.
Below are examples of a cover page and a page from one of my Powerpoint presentations that demonstrate the rule of thirds. Notice that the cover page does not have any dynamic images, but because the title is placed on the upper horizontal line, it is more appealing. You can use lighting effects to also draw the viewer's eye to one of the focal points, as demonstrated in the presentation page example.

This does not mean that you should always follow the rule of thirds. But if you are struggling with design and want to try something that will catch the viewer's eye (perhaps make your pages more "pin-worthy" on Pinterest), try this method out and see if it works for you. Good luck!

You can download this tutorial FREE in my teacher store, which includes two gridline .png graphics and additional tips:


Pin It

Cute School Supplies Clip Art for Commercial Use

 I started creating these little "props" to use in my own lessons almost a year ago. As you probably know, I am pretty slow to post new products because it does take me a while to complete them. So it was such a relief to finally finish this package of school-related graphics yesterday. It includes over 95 PNG files that can be used commercially and/or for educational and personal use. My only requirement is a link back to my website or my teacher store.

One of the great things about these school supplies is that they can be layered with your favorite characters, as demonstrated below...
...or used on their own.
SIDE NOTE: I have had many questions about "layering" and the difference between JPG (or jpeg) files and PNG files. If you scroll down to the bottom, I included a very brief explanation. :)

My school supplies bundle contains many images in full color as well as line-art, so you can have students color the graphics (plus it saves on ink). Below, I combined the iPad-like tablet with my Handwriting Lines clip art, which comes in a variety of lengths and widths and is so easy to work with when creating products for primary students.

I decided to create my people figures separate from the supplies because I think it adds versatility for the user of the graphics. Have you ever wanted to use an image of a group of items, but one item just didn't fit with what you were making? Now you can make your own groupings, like I did with these sports balls and equipment. (Plus, some teachers may not want the cute little people. But the "props" are still "cool" enough to use with older students.)

Another advantage is with the overall design of your product or scrapbook page. Sometimes you have to tweak items to make them work. Above, I was able to position the golf club and golf ball to suit my needs. Below, the book and ruler in the image were both rotated to fit in the girl's hands perfectly. 

PNG vs. JPG files...
In case I have completely confused you with all this talk about "layering" images, it helps to know a little about the types of images if you plan to design things digitally.  So here's a very condensed explanation to the difference between PNG files and JPG files:

The PNG format makes it possible to knock-out the background, so your images easily layer on top of one another without the white (or whatever color) background overlapping. You cannot layer JPG (or jpeg) files like this. 

To demonstrate, see the image below. The girl on the left is a JPG file and the girl on the right in a PNG file. When each is placed on a purplish background, the JPG file will maintain its white background. The PNG's is knocked-out, allowing you to place additional PNG files on top of it. 
Another difference between the two is PNG files never lose their quality.  JPGs, however, will begin to degrade every time you open them, so over time the quality of the image will not be as sharp. Because of this, PNG files are much larger than JPGs, making JPGs (and GIFs) more ideal for web browsing because they load faster. This was something I learned while teaching journalism and advising yearbook and newspaper (because digital photography was not around when I was in college...yes, I'm that old). I picked up a lot during those years, and continue to learn as technology keeps advancing. That's an advantage to teaching: it forces us to keep learning and passing along that knowledge. Of course, I learn just as much from my students as they learn from me.

If you need help working with images in Microsoft Word (which, in my opinion, is one of the worst programs for design/working with images), you can download this free tutorial. People who use Microsoft and do a lot of designing would probably be better off using Powerpoint or Publisher. 

Since I am a Mac girl, I use the iWork applications (Pages, Keynote) and Adobe's Creative Suites apps: Photoshop and InDesign. Pages is much like InDesign, but much easier, so I have actually converted to using Pages more. If you use a Mac, I highly recommend it!

Back to the clip art...
All of my images are PNG files. On occasion I will include additional JPG files, but I will always include the PNG files. You can find all of my packages in the clip art department of my teacher store
Or just click on my button below.

Or if you are looking for specific packages, here are some links to my recent ones:


 I appreciate you stopping by my blog! This post was long overdue, so I apologize for its length. As thanks for reading through it, you can click {HERE} to get some limited-time freebies from some of my new packages. Hurry, though. They will only be available for a limited time. Please read the terms of use if using these for commercial products. Also, they cannot be resold in a clip art package, or altered and resold as clip art. If used in a free product, it must be secured in a PDF document. No exceptions. Thank you!

Pin It

Ten Thoughtful and Inexpensive Graduation Gifts for Your Students

Inexpensive and Thoughtful Graduation Gifts for Students

It's graduation season and for high school teachers this can be a drain on the budget. I love supporting my students and going to their parties, but I also know of many teachers who may opt to skip them because giving money or buying a gift for each graduate is expensive. My husband also teaches at the same school, so there have been years that we've been invited to over 20 parties. Of course, attending them all is next to impossible (especially if they are on the same day), but I still like to acknowledge the students with a small gift.

Here are 10 ideas for graduation gifts:

{For Those Who Need a Gift Now}

1. Ask the office for a list of all the students in the graduating class (a digital copy is preferred). Insert the names into a word-cloud generator, like www.Tagxedo.com or www.Wordle.net. Change the colors to match your school's (or just use fun colors), then download and save the image. Print it on cardstock, frame, and sign the back. (Tips: Add words like "congratulations," "graduate," and their class year for variety. Also, duplicate the name of the student so it appears larger in the cloud, as seen in the first image with "Nicholas.")
Graduation Word Cloud

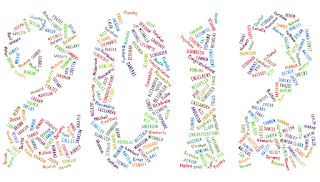
For variety, use a picture of your school mascot, or the year of the graduating class as the format for the cloud. 
2013 Word Cloud: Graduation - Ideas for Graduation Cards & Gifts

Use my 2014 clip art numbers to create 2014 word clouds on www.tagxedo.com.
2014 free graphics download - Use to make fun word cloud images on Tagxedo

Make 2013 word clouds using these clip art images

2. Using one of the word-cloud generators from above, copy the text from a favorite poem, book, or collection of inspirational quotes. After you create the cloud, print and frame it, adding a personal message on the back for the graduate. (See my Dr. Seuss Oh! The Places You'll Go! art prints.)

3. Create a caricature of the student, print it, and frame it or just use it as a card. Use the website www.sp-studio.de to create South Park-style caricatures. High school students love these!
A caricature of the graduate using www.sp-studio.de website.
4. Write a personal handwritten note to each student. Bring up the positive things you remember about having the student in class. Sometimes a note from their teacher letting them know that you care and wish them the best means more to them than any other gift.

{Involves Planning Ahead of Time - Bookmark for Next Year!}
5. Create a 2-column table with the students' names in the first column. Leave the second column blank, but give others room to write. Run copies for each student and distribute. Then have them write one nice thing about each of their classmates. Collect all the papers and either:
     A. cut each row so each student gets a sentiment on each individual strip of paper, OR
     B. type all the sentiments for each student, with each student getting an individual piece of paper with multiple sentiments.
  (Another way to do it is to have a page with each student's name at the top, then pass that page around and have each new student add something nice about that classmate. Then give each student the copy with the handwritten notes from their classmates. This can also be done in a shared Google Docs document. Have each student type in a different color. Drawback: some students are immature and use this as a way to write something inappropriate because it is in front of the class. Having each student write all the comments on their own sheet and turning it in may be more work for you, but it also deters those "exhibitionists" from doing something immature.)
Ten Thoughtful and Inexpensive Graduation Gifts

6. Have your students pose for a class picture. Take a group shot of them, then run copies of 4x6 prints (you can even make a personalized frame on many websites like www.snapfish.com). Buy an inexpensive picture frame (dollar stores are great for these) and you have a personalized gift for less than $2. Write a note to the graduate on the back of the frame/picture and you are set.
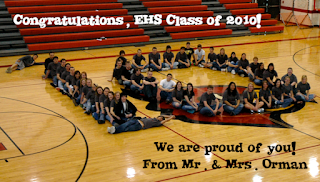
Personalize a class picture, then print & frame.
7. At the beginning of the school year, take a group picture of each class of students you have. Take another picture at the end of the school year. Save the files (I'm assuming you take the pictures with a digital camera). When a student from one of your past or present classes graduates, print the pictures and include them in a card, frame, or inexpensive photo flip album. Include copies of inspirational quotes in between the pictures.

8. For a yearbook/newspaper advisor: Copy the images from the past year onto a CD. Give a copy of the CD as a gift to the graduates. (Note: We used to sell photo CDs at the end of the school year as a fundraiser when I advised the newspaper and yearbook. We were able to fund the printing of our school newspaper with the sales from the CDs. We also made video yearbooks, which helped, as well.)

9. If photos aren't your thing, have your students write "life lessons" when they are in your class. Save these, then make copies of each class for when they graduate. If you have mixed classes (ex.: juniors & seniors in same class), make sure to separate them out by keeping an envelope for each class year. Just label it "Class of 2012" and so on. Then, when they graduate, give them a copy of the booklet with their classmates "life lessons." (*I have a free download of this activity--it is amazing what students will write! They love reading these!)
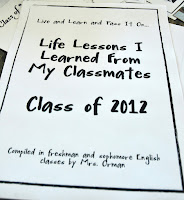
Compile copies of the "life lessons" your students write in class.
10. Another thing you can give the graduate separately or include with the "life lessons" is a compilation of funny things said in class. I try to write these down when they are fresh in my mind (but I miss a lot of them, too). Then make a photocopy and share with the graduates.

Also read 

To help you, I have several inexpensive digital downloads of templates you can use for graduation cards or framed gifts. Here are some of the old favorites and new products I just uploaded:

"If" By Rudyard Kipling Art Print
PDF file

Robert Frost Poetry Art Prints
PDF file

Langston Hughes Poetry Art Prints
PDF file

NEW Products:
Graduation or Promotion Printable Cards You Can Personalize (Any Year)
Microsoft Word document

Graduation or Promotion Graphics (Any Year) for Personal & Commercial Use
PNG files

Class of 2012 Graphics for Personal or Commercial Use
PNG files

Do you have something special you do for graduates? Add your idea in the comments below!

Pin It

Similar Posts

Related Posts Plugin for WordPress, Blogger...

Total Pageviews